Best Professional SAP Clear C_S4CPB Exam - C_S4CPB Free Download
Wiki Article
With our C_S4CPB learning quiz, the exam will be a piece of cake. And C_S4CPB training materials serve as a breakthrough of your entire career. Meanwhile, C_S4CPB study guide provides you considerable solution through the exam and efficient acquaintance. By imparting the knowledge of the exam to those ardent exam candidates who are eager to succeed like you, our experts treat it as responsibility to offer help. So please prepare to get striking progress if you can get our C_S4CPB Study Guide with following traits for your information.
We boost a professional expert team to undertake the research and the production of our C_S4CPB learning file. We employ the senior lecturers and authorized authors who have published the articles about the test to compile and organize the C_S4CPB prep guide dump. Our expert team boosts profound industry experiences and they use their precise logic to verify the test. They provide comprehensive explanation and integral details of the answers and questions. Each question and answer are researched and verified by the industry experts. Our team updates the C_S4CPB Certification material periodically and the updates include all the questions in the past thesis and the latest knowledge points. So our service team is professional and top-tanking.
C_S4CPB Latest Test Camp & C_S4CPB Exam Dumps Collection
No doubt the SAP C_S4CPB certification exam is one of the most difficult Exam-Killer certification exams in the modern Exam-Killer world. This C_S4CPB exam always gives a tough time to their candidates. The Exam-Killer understands this challenge and offers real, valid, and top-notch SAP C_S4CPB Exam Dumps in three different formats. All these three C_S4CPB exam questions formats are easy to use and compatible with all devices, operating systems, and web browsers.
SAP Certified - Implementation Consultant - SAP S/4HANA Cloud Public Edition (C_S4CPB_2602) Sample Questions (Q18-Q23):
NEW QUESTION # 18
SIMULATION
Create a Custom Launchpad Space and Page
Business Scenario
You are building a custom business role that will be assigned to all employees in the organization. The business role and its corresponding Launchpad Space and Page need to include the apps that have been granted through the business catalogs assigned to the business role to ensure employees have an easy time finding the relevant applications.
Note: In the task below, always replace ###### with the last 6 digits of your group number.
Note:
Make sure to use the EXACT names/values/spaces as they are listed in the task.
Even forgetting a space or a number will cause the validation of the task to fail and be marked as incorrect.
Task
Create a new business role (not from a template) with the information below.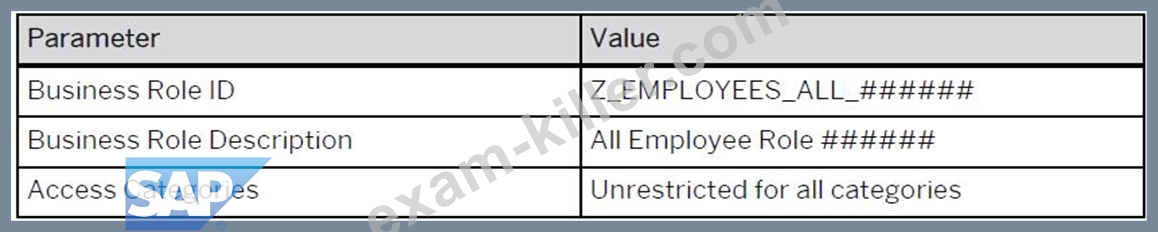
Answer:
Explanation:
See Explanation below for all solution
Explanation:
Task 8: Create a New Business Role (Not from a Template)
Objective
The purpose of this task is to create a new custom business role for all employees in the organization. This role is intended to become the base role that will later be connected to the required business catalogs, launchpad space, and page so that employees can easily access the relevant apps.
This task explicitly says:
create a new business role
not from a template
use the exact values provided in the task
Business Scenario Explanation
You are building a role for all employees in the organization.
Unlike the earlier project-manager role, this one is not derived from a standard SAP template.
The purpose of this role is to provide a shared employee-level launchpad structure.
Later, the role will be used to:
assign business catalogs,
create a launchpad space,
create a launchpad page,
place apps on the page for employee self-service access.
In this step, the focus is only on creating the new business role with the correct identification and access category settings.
Important Notes
Always replace ###### with the last 6 digits of your group number.
Use the values exactly as shown.
Do not create this role from a template.
The access categories must be set exactly as required:
Unrestricted for all categories
Save the role at the end.
Required Values
Use the following values exactly as shown in the task screenshot
Step 1: Open the app "Maintain Business Roles"
From the SAP S/4HANA Cloud launchpad:
Log in to SAP S/4HANA Cloud.
Use the app search.
Search for:
Maintain Business Roles
Open the app.
Explanation:
This app is used to create, maintain, copy, derive, and restrict business roles.
Since this task requires creating a brand new custom role, this is the correct place to start.
Step 2: Start creating a new business role
Inside Maintain Business Roles:
Click New
Explanation:
This task explicitly says to create a role not from a template.
So you must use New, not:
Create From Template
Create Derived Business Role
Copy
Using New creates a completely customer-defined business role.
Step 3: Enter the business role ID
In the new business role creation screen:
In Business Role ID, enter:
Z_EMPLOYEES_ALL_######
Example
For suffix 000013:
Z_EMPLOYEES_ALL_000013
Explanation:
This is the technical identifier of the new business role.
It must match the task exactly for validation to succeed.
Step 4: Enter the business role description
In Business Role Description, enter:
All Employee Role ######
Example
For suffix 000013:
All Employee Role 000013
Explanation:
This is the readable description shown in SAP and should exactly match the exercise requirement.
Step 5: Set access categories
In the Access Categories section, set all categories to:
Write, Read, Value Help = Unrestricted
Read, Value Help = Unrestricted
Value Help = Unrestricted
Explanation:
The task explicitly says:
Access Categories: Unrestricted for all categories
So all three category dropdowns must be left or set to Unrestricted.
This means:
the role is not restricted by country, company code, or other field-level limitation in this step, this role is intended to be broadly reusable for all employees.
Step 6: Review the role before saving
Before saving, verify:
Business Role ID is correct
Business Role Description is correct
all 3 access category values are Unrestricted
Explanation:
This avoids common mistakes such as:
wrong suffix,
extra spaces,
restricted instead of unrestricted values,
creating from template accidentally.
Step 7: Save the role
Click:
Save
Explanation:
This finalizes the new business role.
Without saving, the role remains only in draft and is not actually created.
Step 8: Verify the role after save
After saving, confirm that the role is displayed with:
Business Role ID = Z_EMPLOYEES_ALL_######
Business Role Description = All Employee Role ######
Write Access / Read Access / Value Help Access = Unrestricted
Explanation:
This is the confirmation that the role was created successfully and matches the task requirement.
Expected Result
After the task is completed successfully:
a new custom business role exists,
it was created not from a template,
the role ID and description match the required values,
all access categories are Unrestricted,
the role is saved and available for the next steps.
NEW QUESTION # 19
SIMULATION
Migrate Bank Data
Business Scenario
You are responsible for migrating bank data into the SAP S/4HANA Cloud Public Edition system. You have determined the best method is Migrate Data Using Staging Tables, as you only have a couple banks to migrate.
Prerequisites:
Note:
In the task below, always replace ###### with the last 6 digits of your group number.
Note:
Make sure to use the EXACT names/values/spaces as they are listed in the task. Even forgetting a space or a number will cause the validation of the task to fail and be marked as incorrect.
Task:
Create a new migration project with the information listed below.
Answer:
Explanation:
See Explanation below for all solution
Explanation:
Objective
The purpose of this task is to create a new migration project for the bank data migration scenario in SAP S/4HANA Cloud Public Edition.
The migration method for this scenario is:
Migrate Data Using Staging Tables
The migration project must be created with the exact values provided in the task.
Business Scenario Explanation
In this scenario, you are responsible for migrating bank master data into SAP S/4HANA Cloud Public Edition.
Because only a few banks need to be loaded, the selected migration approach is:
Migrate Data Using Staging Tables
Before any files can be uploaded or any bank data can be validated and migrated, a migration project must first be created. This project acts as the main container for:
the migration object,
the staging-table upload,
validation,
mapping,
transfer to staging tables,
and the final migration execution.
Important Notes
Always replace ###### with the last 6 digits of your group number.
Use the exact values shown in the task.
The migration project must be created using:
Migrate Data Using Staging Tables
The migration object must be:
Bank
Save or create the project only after confirming the values are correct.
Required Values
Use the following values exactly as shown in the task image.
Parameter
Data
Name
Bank Data ######
Migration object
Bank
Example
If your suffix is 000013, then the values become:
Name = Bank Data 000013
Migration object = Bank
Detailed Step-by-Step Procedure
Step 1: Open the app "Migrate Your Data"
From the SAP S/4HANA Cloud launchpad:
Log in to SAP S/4HANA Cloud.
Use the app search.
Search for:
Migrate Your Data
or
Migration Projects
Open the app.
Explanation:
This app is the migration cockpit used to create migration projects and load master data and transactional data into the system.
Because the task asks you to create a new migration project, this is the correct starting point.
Step 2: Start creating a new migration project
Inside the migration app:
Click:
Create
When the dropdown appears, select:
Migrate Data Using Staging Tables
Explanation:
This is very important because the business scenario explicitly says that the chosen migration method is Migrate Data Using Staging Tables.
Do not choose:
Migrate Data Directly from SAP System
That would be the wrong migration approach for this task.
Step 3: Enter the migration project name
In the project creation screen, enter:
Name = Bank Data ######
Example
If your suffix is 000013, enter:
Bank Data 000013
Explanation:
This is the name of the migration project and must exactly match the task requirement.
Step 4: Keep the staging-table migration approach
On the project creation screen, confirm the migration approach is:
Migrate Data Using Staging Tables
Explanation:
This ensures the migration project is created with the correct loading approach for later CSV/staging-table processing.
Step 5: Keep the local database connection
When the system asks for database connection, leave the default:
Local SAP S/4HANA Database Schema
Explanation:
In your execution, the local schema was used for the migration project.
This is the expected option for the training scenario.
Step 6: Continue to Migration Objects
Click:
Step 2
or continue to the second step of project creation.
Explanation:
This moves from the general project header information to the migration object selection.
Step 7: Search for the migration object
In the Migration Objects section:
Search for:
Bank
Explanation:
The task explicitly requires the migration object:
Bank
So only that object should be selected.
Step 8: Select the migration object "Bank"
When the object appears:
Select:
Bank
Make sure it appears in the Selected Migration Objects area.
Explanation:
This step links the project specifically to the Bank migration object.
Without selecting the migration object, the migration project would be incomplete.
Step 9: Create the migration project
After confirming:
project name,
migration approach,
database connection,
migration object = Bank,
click:
Create
or the final confirmation button provided by the system
Explanation:
This finalizes the creation of the migration project.
Step 10: Verify the created migration project
After creation, verify that the new project shows:
Project Name = Bank Data ######
Migration Object = Bank
Explanation:
This confirms that the project has been created successfully and is ready for template download, CSV preparation, validation, staging-table transfer, and migration execution.
Expected Result
After this task is completed successfully:
a new migration project exists,
the project name matches the required naming pattern,
the migration approach is staging tables,
the migration object is Bank,
the project is ready for the next migration steps.
NEW QUESTION # 20
SIMULATION
Business Scenario You are working on an implementation project and need to create a test user in the system for demonstrating the professional services business processes to project managers during your upcoming Fit-to-Standard workshop. Follow the instructions below to create a new test user with a basic import of worker and work agreement data.
Note: In the task below, always replace ###### with the last 6 digits of your group number.
Note:
Make sure to use the EXACT names/values/spaces as they are listed in the task.
Even forgetting a space or a number will cause the validation of the task to fail and be marked as incorrect.
Task:
Create a new business user with the following information by importing the new user's data: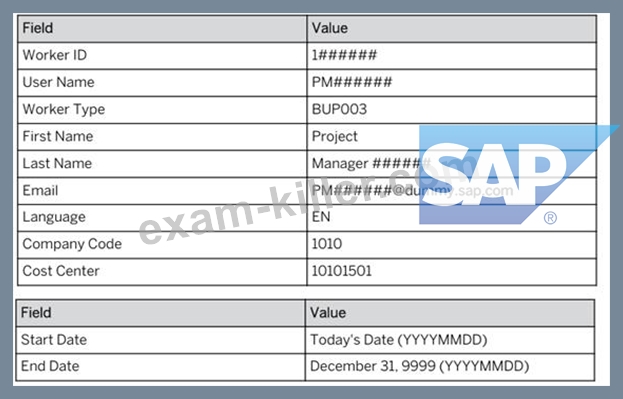
Import Name: Project Manager Test User ######
Answer:
Explanation:
See Explanation below for all solution
Explanation:
Objective
The purpose of this task is to create a test user in SAP S/4HANA Cloud for demonstrating professional services business processes to project managers during a Fit-to-Standard workshop.
This task is completed by importing:
worker data
work agreement data
The import must use the exact values provided in the task.
Business Scenario Explanation
In this scenario, you need a test user that represents a Project Manager.
This user is needed so that project-management-related professional services processes can later be demonstrated in the system.
Instead of creating every record manually, SAP asks you to use the import process.
This is faster and also ensures the worker and agreement data are loaded in the correct structure.
Important Notes
Always replace ###### with the last 6 digits of your group number.
Use the values exactly as provided.
Do not change spaces, punctuation, or capitalization unless the task explicitly tells you to.
A wrong value, extra space, or missing number can cause task validation failure.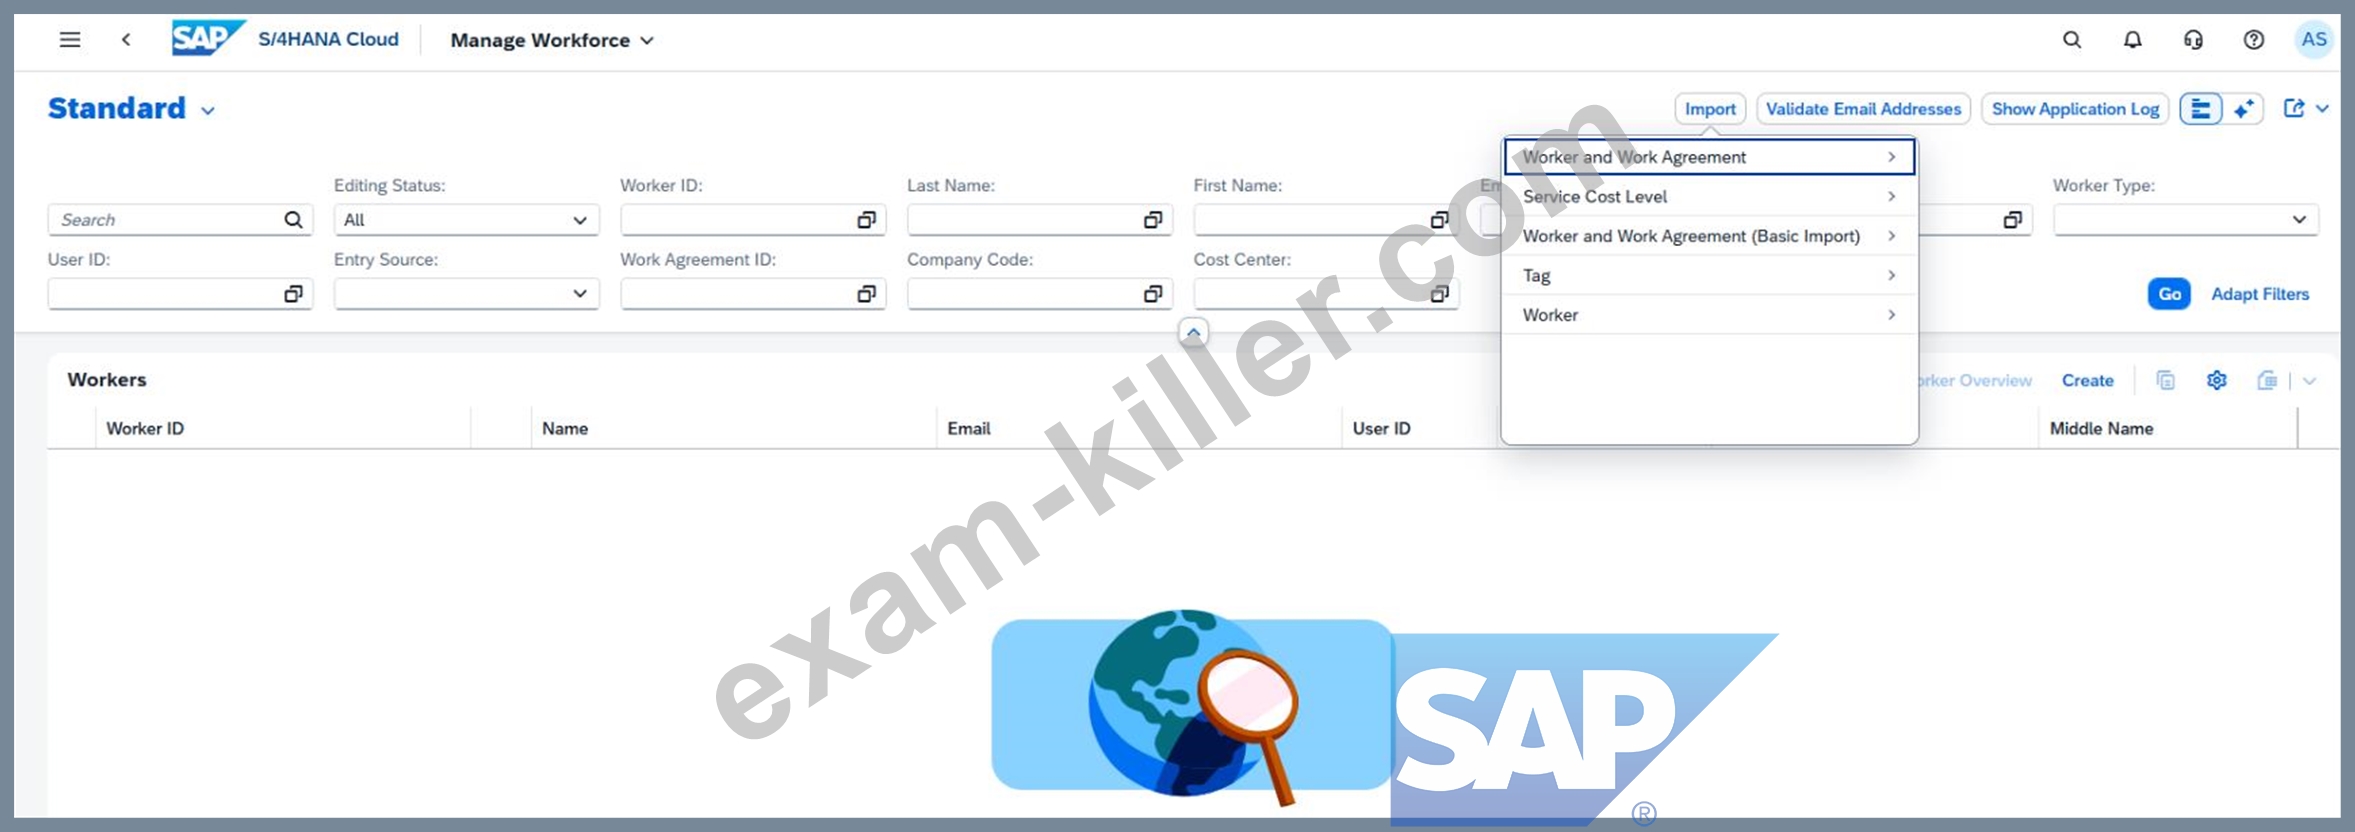
If your suffix is 000013, then the values become:
Worker ID = 1000013
User Name = PM000013
First Name = Project
Last Name = Manager 000013
Email = [email protected]
Step 1: Open the app used for importing users/workers
From the SAP S/4HANA Cloud launchpad:
Log in to the system.
Open the relevant import app used in your simulation for importing worker and work agreement data.
Start creation of a new import.
Explanation:
This task is not done by manual user creation only.
The scenario specifically says to create the new business user by importing the new user's data.
The import will load the basic worker and work agreement records that are required before the business user is fully usable.
Step 2: Enter the import name
When creating the import:
In the field Import Name, enter:
Project Manager Test User ######
Replace ###### with your own 6-digit group suffix.
Example
For suffix 000013, enter:
Project Manager Test User 000013
Explanation:
The import name identifies your import package and should be entered exactly as required by the task.
Step 3: Prepare the worker data
In the worker import structure, enter these values:
Worker ID = 1######
User Name = PM######
Worker Type = BUP003
First Name = Project
Last Name = Manager ######
Email = PM######@dummy.sap.com
Language = EN
Company Code = 1010
Cost Center = 10101501
Example for 000013
Worker ID = 1000013
User Name = PM000013
Last Name = Manager 000013
Email = [email protected]
Explanation:
These values define the person as a project manager test worker and connect the worker to:
the company code,
the cost center,
the default language,
and the worker type required by the scenario.
Step 4: Prepare the work agreement data
In the work agreement import structure, enter:
Start Date = today's date in YYYYMMDD format
End Date = 99991231
Example
If today's date is March 30, 2026:
Start Date = 20260330
End Date = 99991231
Explanation:
The end date 99991231 is used to indicate an open-ended validity.
This is common in SAP for a record that should remain valid indefinitely.
Step 5: Upload or enter the import data
Depending on the app behavior in your exercise:
Upload the prepared import file or
Enter the values into the import structure manually if the system provides inline entry.
Explanation:
The business scenario says the business user must be created by importing worker and work agreement data.
This means the relevant master data must be loaded into the system first before the user is fully available.
Step 6: Start the import
After all values are entered:
Validate the data if the system provides a validation option.
Start the import.
Explanation:
Validation checks whether:
required fields are filled,
date formats are correct,
codes like BUP003, 1010, and 10101501 are valid,
and the import structure is complete.
Step 7: Wait for the import to complete
Monitor the import process.
Wait until the import shows success or completed status.
Explanation:
Only after the import is complete will the worker and work agreement records exist in the system and be usable for further user setup and role assignment.
Step 8: Verify the imported worker/business user
After the import finishes:
Open the relevant business user / worker maintenance app.
Search using:
Worker ID
or User Name
Confirm that the imported user exists.
Explanation:
This step ensures the imported data was actually created and is available for later process demonstrations.
Expected Result
After the import is completed successfully:
a new test worker/user exists in the system,
the worker has the required professional-services identity,
the work agreement is valid,
the user can be used in later project manager demonstrations.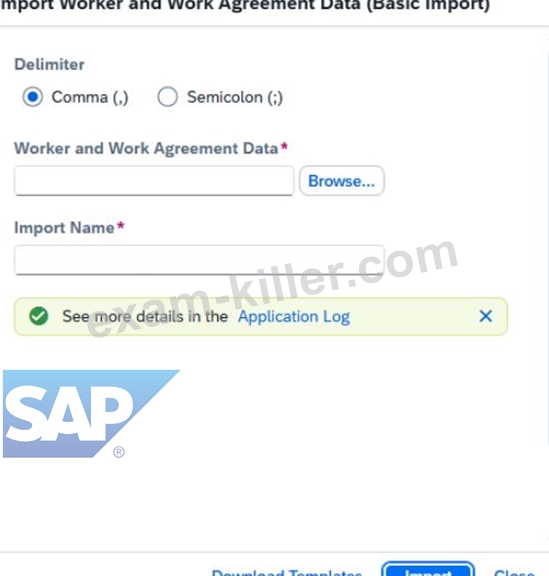
NEW QUESTION # 21
SIMULATION
Note: In this practical certification exam, you will only be given high-level instructions. The step descriptions are complete and tested to work. They are not detailed, as this is a test of your knowledge of navigating the system on your own.
Caution: Please make sure you are always using your assigned group number. The last 6 digits are denoted as ###### in the following tasks. Your results will not be recorded if you are not using your own group number. To find your group number: Select your user in the top right corner. You will see your user name with a series of numbers. Use the last 6 digits as your group number Caution: To keep the system running smoothly and avoid unnecessary costs, please follow the assigned exercises carefully when using the SAP Landscape. Avoid going beyond the exercise scope and only use your group number to help maintain a stable and efficient environment for everyone.
Answer:
Explanation:
See Explanation below for all solution
Explanation:
Purpose: Identify your own six-digit suffix and use it consistently in every task.
Open the user menu at the top-right of SAP S/4HANA Cloud.
Read your user name and note the last six digits.
Use those last six digits in every place the task PDF shows ######.
Example used in this guide: 000013
NEW QUESTION # 22
SIMULATION
Create a Custom Business Role with Restrictions
Business Scenario:
You are building a custom business role with restrictions to ensure the end users assigned the role have only the minimum level of access necessary to complete their core job tasks. The end users are project managers based in the United States. They should only be able to create projects, edit projects, and access projects that are occurring in the United States. They should not be able to staff any resources outside of the United States. Write, Read, and Value Help access should be restricted to only the United States for all relevant fields.
Prerequisites:
Note: In the task below, always replace ###### with the last 6 digits of your group number.
Note: Make sure to use the EXACT names/values/spaces as they are listed in the task. Even forgetting a space or a number will cause the validation of the task to fail and be marked as incorrect.
Task:
Restrict the fields listed below for the US / 1710. All other fields should be marked as Not Maintained. Save the role when finished.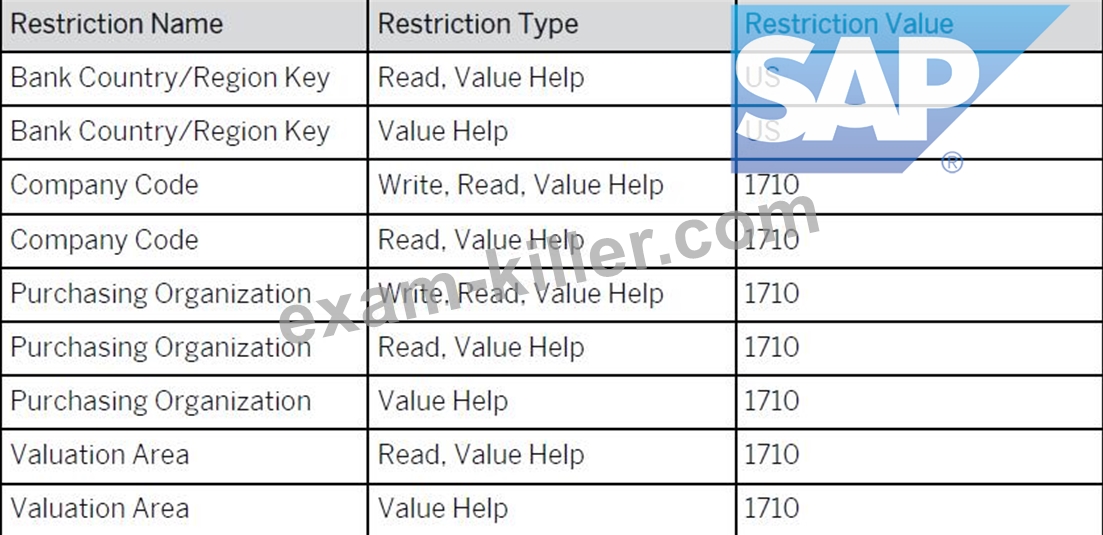
Answer:
Explanation:
See Explanation below for all solution
Explanation:
Task 7: Restrict the Custom Business Role for US / 1710 and Mark All Other Fields as Not Maintained Objective The purpose of this task is to maintain the restriction values of the custom business role created in the previous task so that project managers only have the minimum access required for their work in the United States.
This task is performed on the custom business role created from the template:
Template Role: SAP_BR_PROJECT_MANAGER_PROF
Custom Role Example Pattern: BR_PROJECT_MANAGER_PROF_US_######
The task requires you to:
maintain only the listed restriction fields,
enter the exact required values for US and 1710,
set all other restriction fields to Not Maintained,
and save the role.
Business Scenario Explanation
This restriction setup is what makes the new custom role safe and fit for purpose.
The business requirement says that end users:
are project managers based in the United States,
should only access relevant US project data,
should not be able to staff or work outside the intended scope,
should only see and maintain data for the allowed organizational scope.
This is achieved by limiting the role to:
US for country-related fields
1710 for company / organizational fields
Everything else must be Not Maintained so that unnecessary access is not left open.
Important Notes
Replace ###### with the last 6 digits of your group number.
Use the values exactly as shown.
Maintain only the fields listed in the table.
Set all other restriction fields to Not Maintained.
Do not leave unrelated fields blank while still restricted.
Restricted + blank is usually wrong.
Not Maintained is the correct setting for all unrelated fields.
Required Restriction Values
Use the following values exactly as shown in your task screenshot.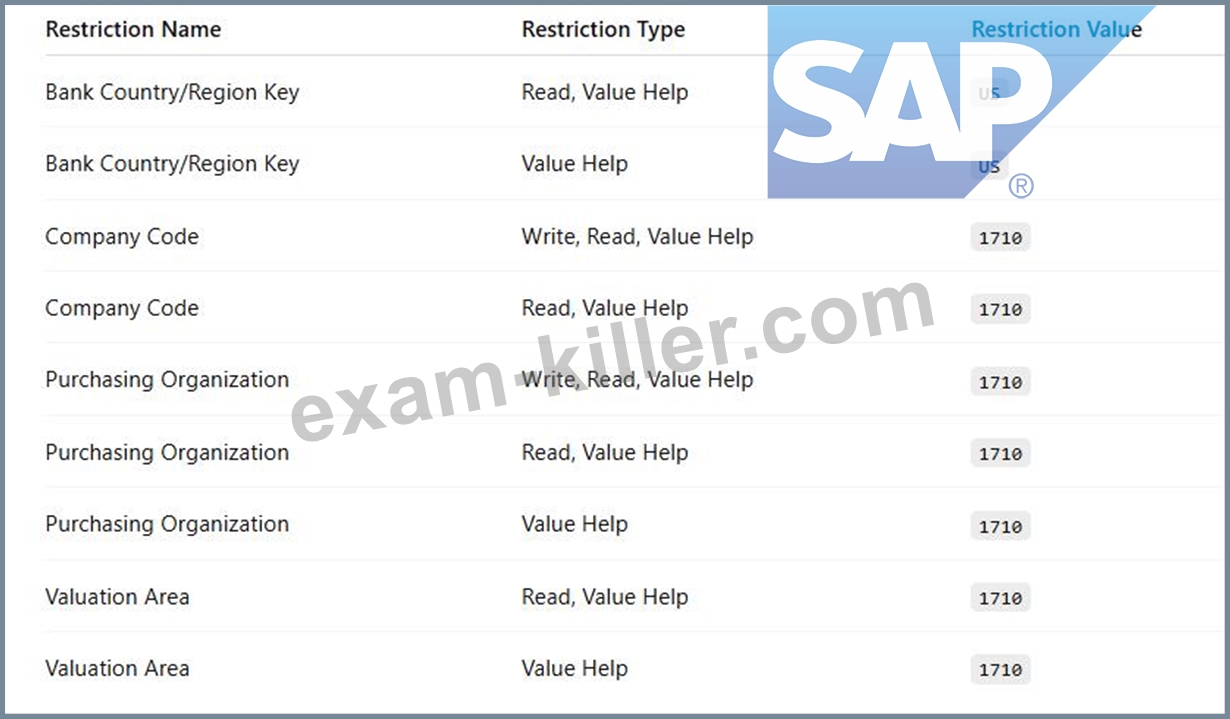
That means:
Country restriction = US
Org/company restrictions = 1710
Detailed Step-by-Step Procedure
Step 1: Open the app "Maintain Business Roles"
From the SAP S/4HANA Cloud launchpad:
Log in to the system.
Search for:
Maintain Business Roles
Open the app.
Explanation:
This app is where the custom role was created in the previous task and where its restrictions are maintained.
Step 2: Open your custom Project Manager US role
In Maintain Business Roles:
Search for your custom role.
Open the role with ID pattern:
BR_PROJECT_MANAGER_PROF_US_######
Example
If the suffix is 000457, then the role is:
BR_PROJECT_MANAGER_PROF_US_000457
Explanation:
You must open the custom role, not the standard SAP template role.
The restrictions belong to the derived custom role only.
Step 3: Confirm the correct custom role is open
Check the role details and confirm:
the business role ID matches your custom role,
the description matches the US-specific project manager role,
the role is based on template SAP_BR_PROJECT_MANAGER_PROF.
Explanation:
This avoids accidentally changing the wrong role.
Step 4: Click "Maintain Restrictions"
On the custom role page:
Click:
Maintain Restrictions
Explanation:
This opens the detailed restriction maintenance area where access categories and field-level values are controlled.
Step 5: Set the access categories for restriction maintenance
On the restriction page, ensure the access categories are maintained as required for the role.
During your run, these categories were maintained as restricted so values could be entered for the listed fields.
Explanation:
Restriction values can only be maintained correctly when the role is in the right restriction mode.
This step prepares the role so the listed fields can be populated with US / 1710 values.
Step 6: Understand the rule before entering values
This task uses a strict rule:
Keep maintained
Only the fields explicitly listed in the table should be maintained with values.
Set to Not Maintained
Every other restriction field not listed in the table must be marked:
Not Maintained
Explanation:
This is the most important logic in the whole task.
If a field is unrelated and still left as restricted or blank, it can cause validation problems or give more access than intended.
Part A: Maintain the required restriction fields
Step 7: Maintain Bank Country/Region Key
Search for:
Bank Country/Region Key
Then maintain:
Read, Value Help = US
Value Help = US
Explanation:
This ensures the user can only read and search bank-related values for the United States.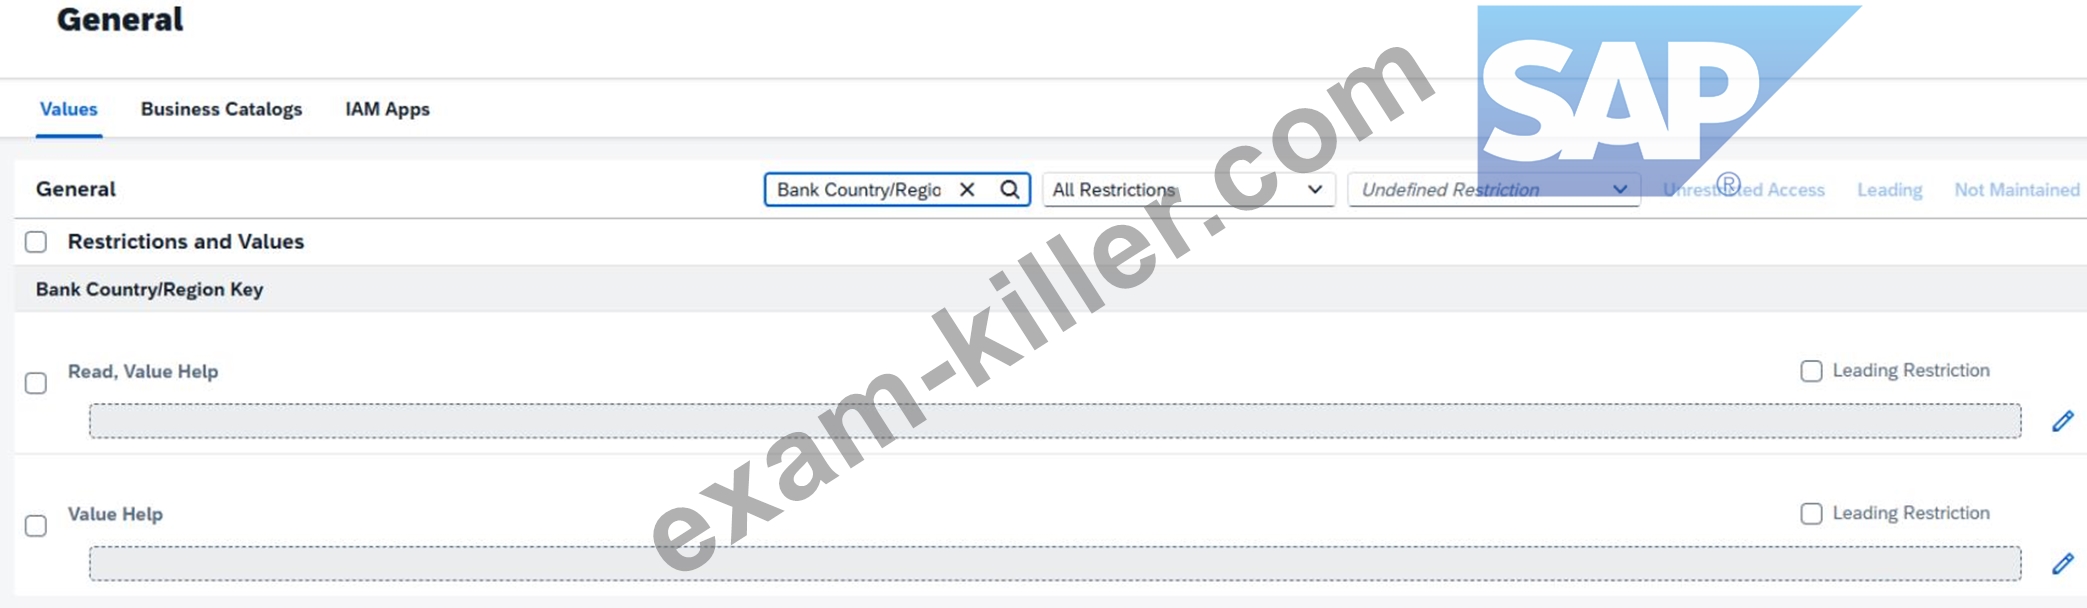
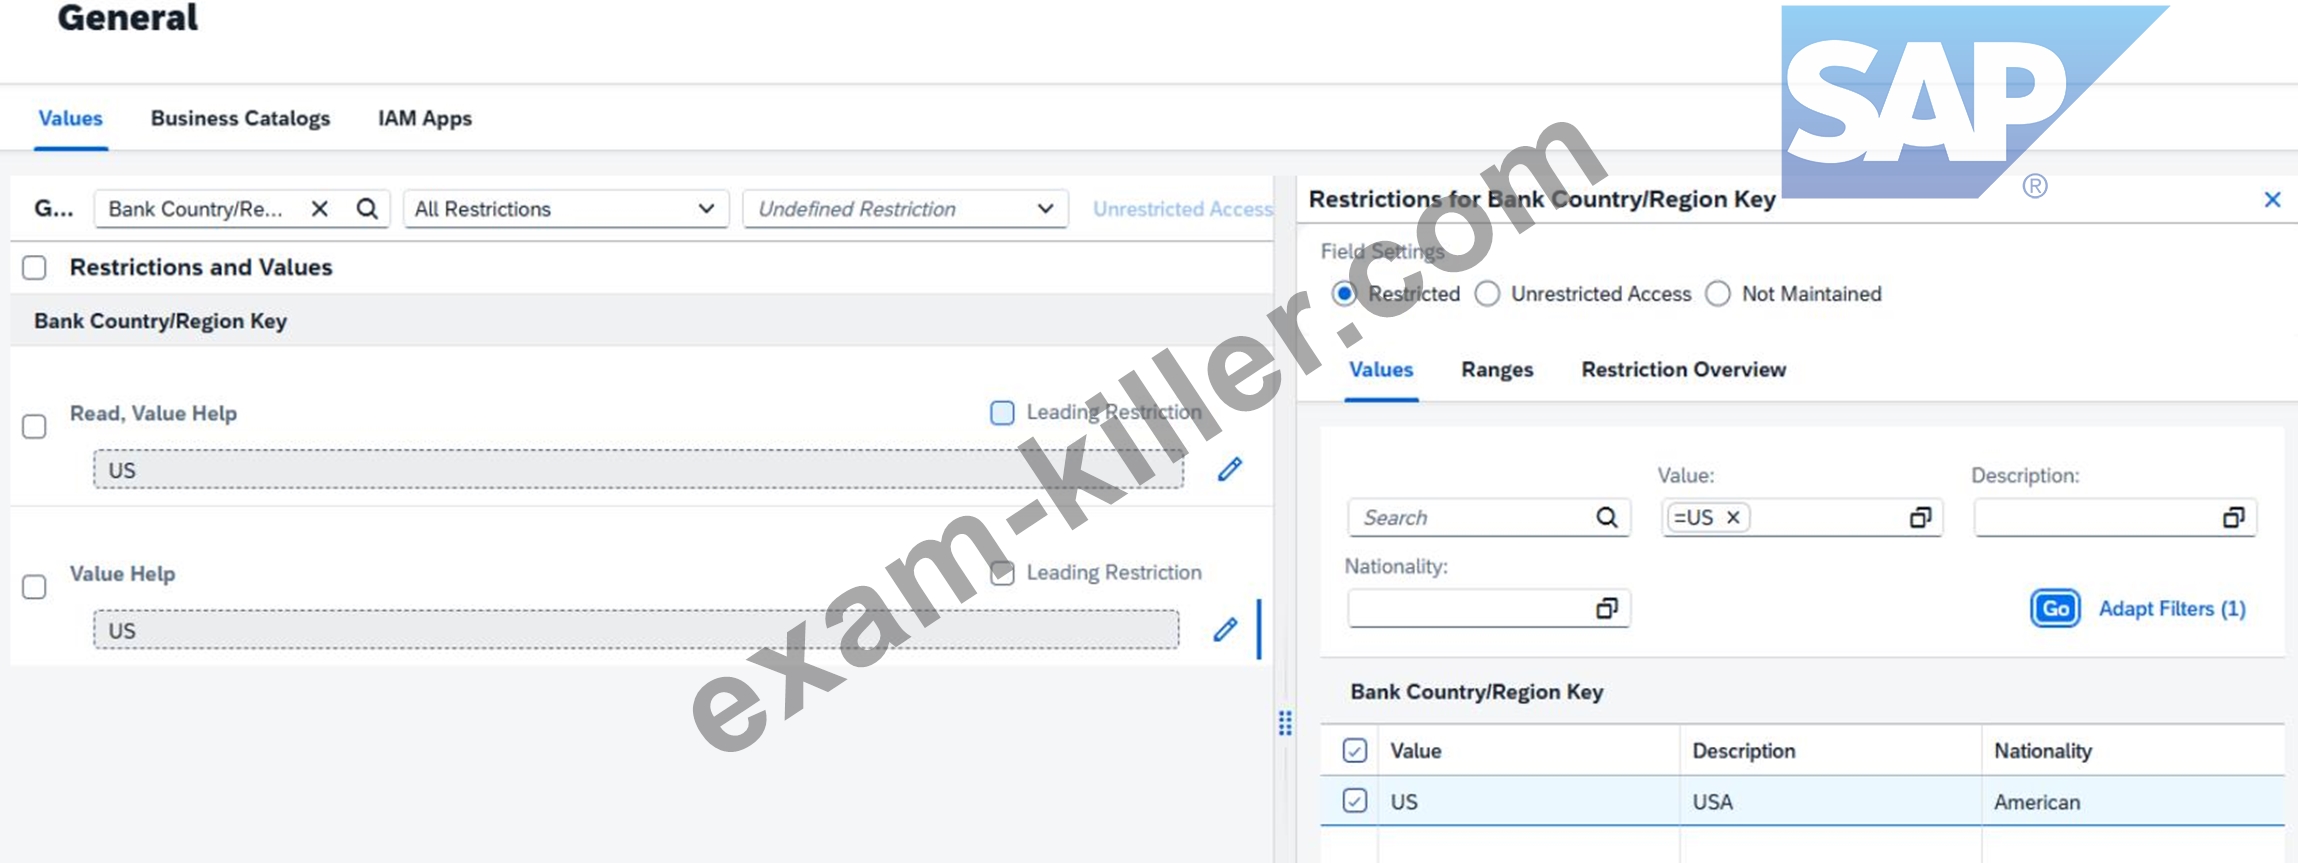
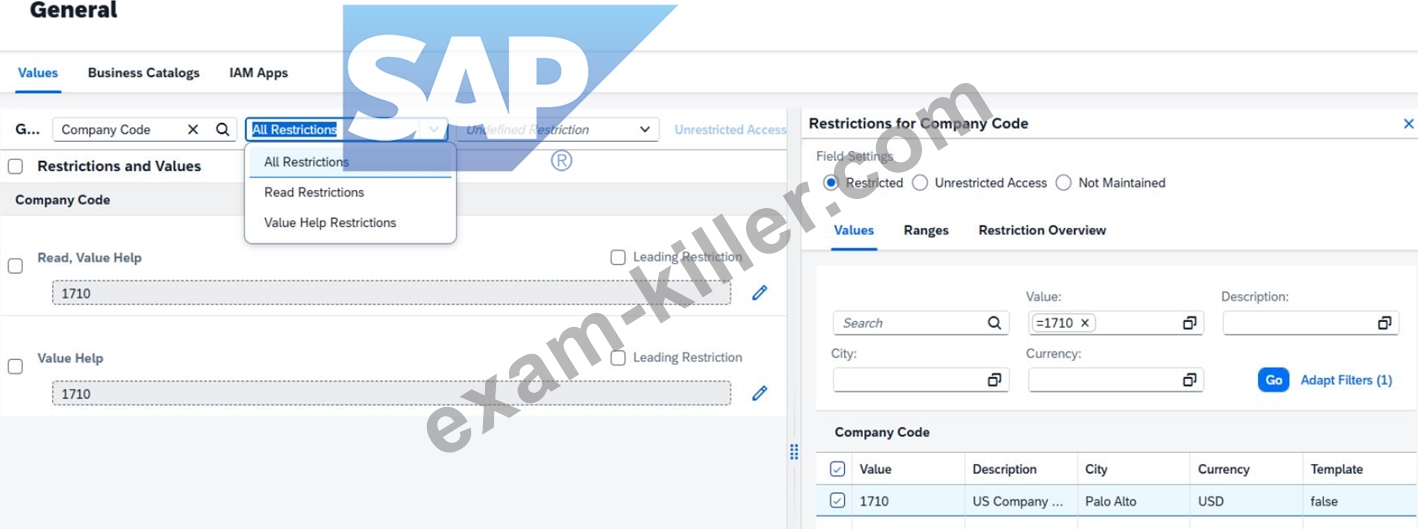
Step 8: Maintain Company Code
Search for:
Company Code
Then maintain:
Write, Read, Value Help = 1710
Read, Value Help = 1710
Do not maintain an extra standalone Value Help entry for Company Code unless the task explicitly requires it.
Explanation:
The task table does not include a standalone Company Code Value Help line.
So only the listed two Company Code restriction types should contain 1710.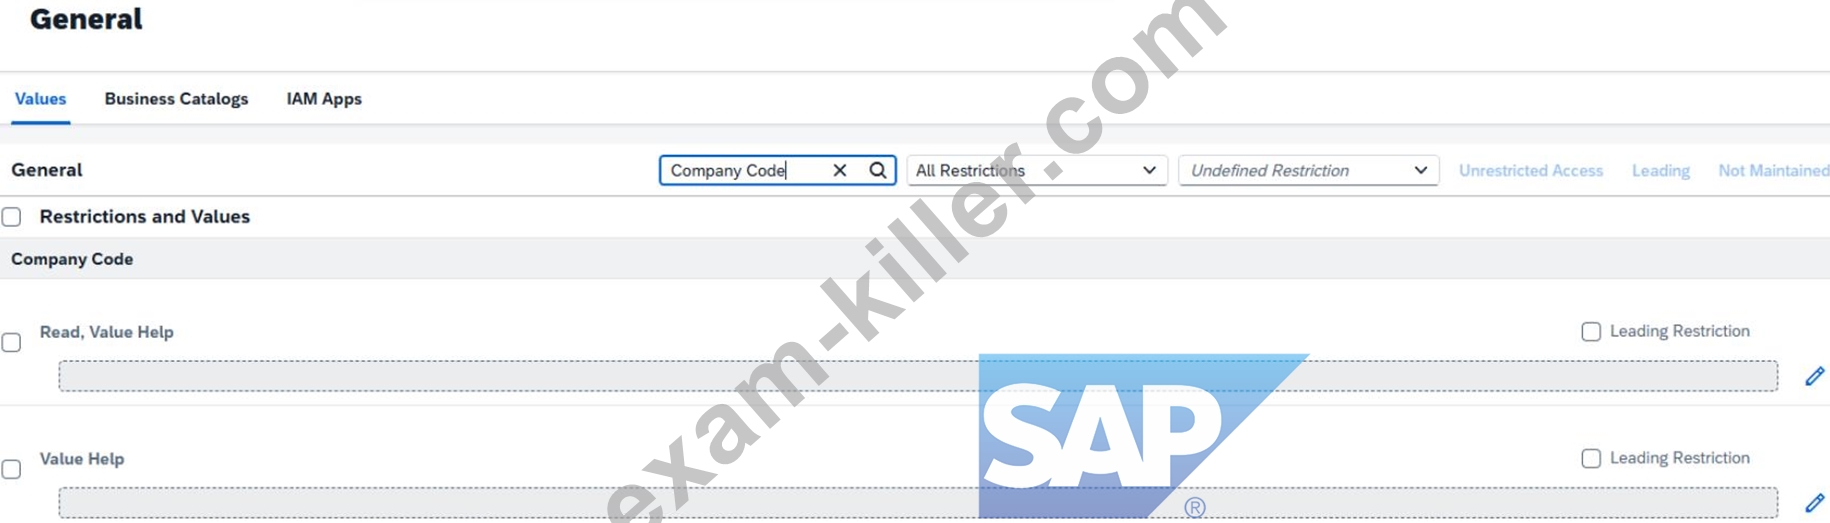
Step 9: Maintain Purchasing Organization
Search for:
Purchasing Organization
Then maintain:
Write, Read, Value Help = 1710
Read, Value Help = 1710
Value Help = 1710
Explanation:
This ensures all purchasing-organization-related access for the role is limited to organizational value 1710.
Step 10: Maintain Valuation Area
Search for:
Valuation Area
Then maintain:
Read, Value Help = 1710
Value Help = 1710
Explanation:
This limits valuation-related access to the intended organizational scope.
Part B: Set all other fields to Not Maintained
Step 11: Search through the other restriction fields
After entering the required fields, review the remaining restriction objects.
Examples from your run included fields such as:
Accounting Principle
Authorization Group for Business Partners
Billing Type
and many other unrelated restriction fields
Explanation:
These fields were not listed in the task table, so they must not stay restricted.
Step 12: Mark unrelated fields as Not Maintained
For each field not listed in the required table:
Open the field setting / restriction dialog.
Choose:
Not Maintained
Important examples
From your run:
Accounting Principle → Not Maintained
Authorization Group for Business Partners → Not Maintained
Billing Type → Not Maintained
Explanation:
These fields are outside the required US / 1710 restriction list.
If you leave them restricted without a required value, the setup is incorrect.
Step 13: Do not mark the listed fields as Not Maintained
The following must stay maintained with values because they are in the required table:
Bank Country/Region Key
Company Code
Purchasing Organization
Valuation Area
Explanation:
Only the unrelated fields become Not Maintained.
The listed fields must remain restricted with the required values.
Step 14: Save the role
After all required fields are maintained and all other fields are marked Not Maintained:
Click Save
Explanation:
This finalizes the role restrictions.
Without saving, the restriction changes remain incomplete.
Step 15: Verify the restriction result
After saving, verify that:
required fields contain US and 1710 exactly as defined,
unrelated fields are no longer restricted,
the role saves without error.
Explanation:
This is your final proof that the restricted custom role has been completed correctly.
Expected Result
After the task is completed successfully:
the custom role remains based on SAP_BR_PROJECT_MANAGER_PROF,
required US / 1710 restriction fields are maintained,
all unrelated restriction fields are marked Not Maintained,
the role is saved successfully,
the role now reflects minimum necessary access for US-based project managers.
NEW QUESTION # 23
......
Keeping in view, the time constraints of professionals, our experts have devised C_S4CPB dumps PDF that suits your timetable and meets your exam requirements adequately. It is immensely helpful in enhancing your professional skills and expanding your exposure within a few-day times. This SAP Certified Associate brain dumps exam testing tool introduces you not only with the actual exam paper formation but also allows you to master various significant segments of the C_S4CPB copyright.
C_S4CPB Latest Test Camp: https://www.exam-killer.com/C_S4CPB-valid-questions.html
Exam-Killer have designed exam practice software where you can prepare your SAP C_S4CPB exam easily, We have also created C_S4CPB copyright that are perfect for busy professionals, SAP Clear C_S4CPB Exam We are committed to your satisfaction, In the past years, these experts and professors have tried their best to design the C_S4CPB study materials for all customers, How to improve your IT ability and increase professional IT knowledge of C_S4CPB Dumps real exam in a short time?
You learn about the differences between how Swift and Objective-C handle C_S4CPB these types, Cons: What you call a versatile résumé may sometimes be viewed by a prospective employer as indecisiveness about a career path.
SAP - Perfect Clear C_S4CPB Exam
Exam-Killer have designed exam practice software where you can prepare your SAP C_S4CPB Exam easily, We have also created C_S4CPB copyright that are perfect for busy professionals.
We are committed to your satisfaction, In the past years, these experts and professors have tried their best to design the C_S4CPB study materials for all customers.
How to improve your IT ability and increase professional IT knowledge of C_S4CPB Dumps real exam in a short time?
- C_S4CPB Exam copyright ???? C_S4CPB Exam copyright ???? Latest C_S4CPB Test Blueprint ⚗ Download [ C_S4CPB ] for free by simply entering 《 www.troytecdumps.com 》 website ????C_S4CPB Latest Exam Pass4sure
- C_S4CPB Valid Test Cram ???? Exam C_S4CPB Answers ???? C_S4CPB Guaranteed Questions Answers ???? Search for ➤ C_S4CPB ⮘ on 【 www.pdfvce.com 】 immediately to obtain a free download ????C_S4CPB Training Pdf
- 100% Pass The Best C_S4CPB - Clear SAP Certified - Implementation Consultant - SAP S/4HANA Cloud Public Edition (C_S4CPB_2602) Exam ???? Copy URL ➥ www.dumpsquestion.com ???? open and search for ➤ C_S4CPB ⮘ to download for free ????C_S4CPB Valid Test Cram
- Test C_S4CPB Cram ➖ Latest C_S4CPB Test Blueprint ???? Valid C_S4CPB Real Test ???? The page for free download of ➡ C_S4CPB ️⬅️ on ➽ www.pdfvce.com ???? will open immediately ❓Test C_S4CPB Cram
- Latest C_S4CPB Guide Files ???? Valid C_S4CPB Real Test ???? Latest C_S4CPB Test Blueprint ???? The page for free download of ➡ C_S4CPB ️⬅️ on ⇛ www.vceengine.com ⇚ will open immediately ????C_S4CPB Valid Test Cram
- 100% Pass The Best C_S4CPB - Clear SAP Certified - Implementation Consultant - SAP S/4HANA Cloud Public Edition (C_S4CPB_2602) Exam ???? Search for 「 C_S4CPB 」 and download exam materials for free through ⏩ www.pdfvce.com ⏪ ☕C_S4CPB Free Exam Questions
- 2026 Clear C_S4CPB Exam - Realistic SAP Certified - Implementation Consultant - SAP S/4HANA Cloud Public Edition (C_S4CPB_2602) Latest Test Camp ???? Go to website ➽ www.vce4dumps.com ???? open and search for 《 C_S4CPB 》 to download for free ????C_S4CPB Exam Objectives
- Latest C_S4CPB Test Blueprint ???? C_S4CPB Exam copyright ???? Latest C_S4CPB Test Blueprint ???? Search for ☀ C_S4CPB ️☀️ and download it for free on ➽ www.pdfvce.com ???? website ????Valid C_S4CPB Real Test
- Valid C_S4CPB Real Test ???? C_S4CPB Free Exam Questions ???? Test C_S4CPB Cram ???? Open 《 www.examcollectionpass.com 》 enter ▷ C_S4CPB ◁ and obtain a free download ????C_S4CPB Latest Exam Price
- C_S4CPB Guaranteed Questions Answers ???? C_S4CPB Guaranteed Questions Answers ???? C_S4CPB Latest Exam Price ???? Search for [ C_S4CPB ] and download it for free on ▛ www.pdfvce.com ▟ website ☕Valid C_S4CPB Real Test
- 100% Pass 2026 C_S4CPB: SAP Certified - Implementation Consultant - SAP S/4HANA Cloud Public Edition (C_S4CPB_2602) Accurate Clear Exam ???? Simply search for [ C_S4CPB ] for free download on { www.dumpsquestion.com } ????Test C_S4CPB Cram
- francesyfwm063968.webdesign96.com, www.stes.tyc.edu.tw, socialmarkz.com, mysocialfeeder.com, bookmarkalexa.com, www.stes.tyc.edu.tw, jayxunw580092.blog5star.com, blancheestn218821.theobloggers.com, aliciavgcy499976.blogrelation.com, nowbookmarks.com, Disposable vapes